submit a ticket
submit
free hosting
request
Home > Regular flash template help > How to Create Additional Buttons for a Flash Template Using Adobe Flash ?
How to Create Additional Buttons for a Flash Template Using Adobe Flash ?
This tutorial will show you how to make additional buttons for your Flash movie that will keep the characteristics of the existing buttons yet will display different words and have a different URL link.1. First, open the .fla file in Flash, and locate the buttons on the stage by dragging the pink playhead at the top of the Timeline until the buttons appear on the screen.

Fig.1 above shows the main Timeline. The row of buttons are in a layer named "nav bar" and are contained in a Movie Clip. Doubleclick on the row of buttons with the black arrow tool.
Flash now displays the timeline of the Movie Clip containing the buttons:

In Fig.2 above, the row of buttons are in a Layer named 'txt bttns'. Unlock this Layer if necessary, and with the black arrow tool, click once on a button (here we selected the last one on the right).
In Fig.2, the Properties panel tells you that you have selected an "Instance of: nav4" The Swap tab (circled above) is what you will use to place your new button, but first you'll need to create it. You will do so by duplicating two existing symbols.
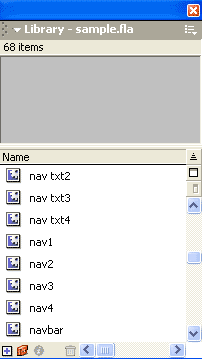
2. Open the Library for your movie (F11 key, or Window>Library).
 3. In this sample, the button is made up of several symbols, contained in a MovieClip named 'nav4'. We are going to Duplicate a couple symbols and create a new MovieClip, which we'll name 'nav5'.
4. In the Library panel, right-click on the symbol that holds the text for your button, in this case, the symbol named 'nav txt4'. Choose Duplicate from the list.

The Duplicate Symbol window opens
 In the Name field, type nav txt5 replacing the 'nav txt4 copy'. Click OK to close the window.
5. Next, repeat these steps on the Movie Clip symbol that contains all your button's elements. In this case it is the symbol named nav4. (Right-click on nav4 in the Library panel, choose Duplicate, change the name to nav5 in the Duplicate Symbol window, click OK to close the window.) You should still be in the screen displayed in Fig.2 above.
6. Click once on the last button in the row, nav4, to select it. From Flash's top menu choose Edit>Copy, then Edit>Paste in Place
7. Use the arrow key on your keyboard to nudge the new button over to the right so it is last in the row of buttons.
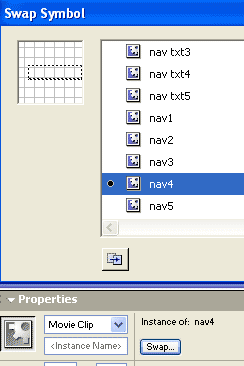
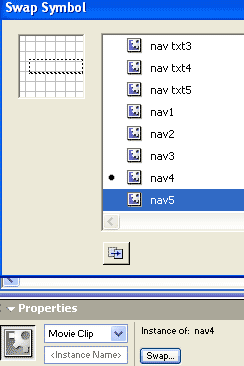
8. With the new button still selected on the stage, go to the Properties panel and click on the Swap tab (circled in Fig.2 above). The Swap Symbol window will open:
nav4 is selected: | Click on nav5, then click OK to close the window |
If you are using the .txt file that came with your tempate to display words and configure links, you will need to add the new information there as well. (If your Flash movie is not using an external .txt file, skip this part)
Open the .txt file in Notepad. Locate the &button4=CONTACT US (or similar) and directly after it, type &button5= and the words you want your new button to show, such as &button5=PRODUCTS
Then, locate the &url4=# and type directly after it &url5=#
Save the .txt file with your changes to 3 folders in your template pack - the fla folder, the html/blank folder, and the html/filled folder. This will ensure that the changes you just made in the .txt file will reflect in your Flash .swf movie no matter where you are playing it from.
Return to Flash. You will now finish up by making a few configurations to your new nav5 Movie Clip.
Your Flash screen should look similar to Fig.3 below, where we have circled the new symbol

Double-click on this new symbol with the black arrow tool. Flash now displays its timeline:

9. First, you'll update the link URL for your new button.
10. Unlock the layer that contains the invisible button, if necessary. In Fig.4 above it is the layer named 'invis'. Also, lock each of the layers beneath it so you don't accidently select or move one of them.

11. With the black arrow tool, click once on the invisible button (the light blue rectangle as in Fig.4 above).
Check in the Properties panel to make sure it says Button for the selected symbol's type.

12. Press the F9 key on your keyboard to open the Actions panel. Make sure it says Actions - Button at the top. In the script for this button, there will be lines similar to: on (release) { getURL(/:url4); Replace /:url4 with /:url5 so your script reads: on (release) { getURL(/:url5);
13. Close the Actions panel. Then, lock and hide the 'invis' Layer. Unlock the layer that holds the text. In Fig.4 above it is the layer named 'txt'.
14. Select the first keyframe of the txt layer (the black dot in the timeline), then click on the movie clip with text (as circled in Fig.5 below)

15. In the Properties panel, click the Swap tab, and swap nav4txt to nav5txt. Do this for each keyframe in the txt layer: click once on the keyframe (black dot), click once on the movie clip with text box, and swap symbols. In this example (as shown in Fig.5 above) you'll swap symbols in a total of 6 keyframes (different Flash movies will of course differ as to the amount of keyframes you'll need to change).
16. And, for the final configuration, you'll change the text for the button. In this example the .txt file included with your template package is governing what words are displayed on your button; if you are not using a .txt file and are unsure how to create the new text for your button in Flash, refer to the tutorial: How to Change the Text in a Flash Template Using Adobe Flash
17. With the black arrow tool, double-click on the movie clip with text box (circled in Fig.5). Flash opens the navtxt 5 movie clip's timeline:

In this particular example there are two layers of text boxes - duplicates of each other, and each a different color and slightly offset to give the words in your Flash movie some depth. Therefore we need to make our change twice, once for each. Unlock (if necessary) the top layer and lock the layer beneath, as shown in Fig.6. Click on the top layer's keyframe, then click on the dotted text box on the stage.
In the Properties panel locate the Var (for variable) field, circled here:

Change the variable name for your new button's text - in this case, change /:button4 to read /:button5 Then lock the top layer, unlock the layer beneath, click on the dotted text box on the stage, and change its variable name to /:button5 as well. 18. Test out your .swf to see your changes (Ctrl-Enter).
Flash Editing help
- Getting started with a flash template ?
- How to make flash header links link to html pages ?
- How to create a mail link in flash ?
- How to insert background music in flash ?
- How to create additional buttons in flash ?
- How to create a new link in flash ?
- How to create a scrollbar in flash ?
- Flash/php contact form installation ?
- How to replace images in flash ?
- How to change the text in a flash ?
- How to insert a sound effect in flash ?
- How to insert text in a flash movie ?
- How to exchange images in flash ?
- How to insert a new image in flash ?
- How to add a new page to a existing flash site ?